
This post is to demonstrate how to use vCO with vCAC extensibility to rename a VM during vCAC 6.0.x provisioning automatically including an incrementing unique identifier.
I’ve read many blogs and posts on how to do this. None of them show how to do it without vCAC Designer, powershell, or both. This “how to” utilizes ONLY vCAC and vCO (no designer or powershell needed). From what I have read, the focus moving forward will be on vCO with Designer being deprecated. So, if you don’t know vCO or don’t use it with vCAC I would learn it.
First, I’m using vCAC 6.0.1.2. I’m not sure the minimum version needed but 6.0 would probably work. I’m also using the latest vCO 5.5.1 appliance. The prerequisites you need are the vCAC 6.0.1 plugin . This will give you all of the workflows that you need in vCO. As of this writing, the link to the plugin is: https://solutionexchange.vmware.com/store/products/vmware-vco-plug-in-for-vcac-6-0-1#.U9gj0vldU-0″ title=”vCAC 6.01 vCO plugin”></
For this to all work, you must set up vCAC extensibility with vCO. There is a really good blog post on how to do this. The only difference is you will not update design center but instead the settings will be tied between vCAC and vCO directly. Just be sure your vCO endpoint is setup on your vCAC. I would recommend reading part 2 for a complete understanding of how this works. http://www.vmtocloud.com/how-to-extend-vcac-with-vco-part-1-installation/
Once you have this piece complete and your External stubs installed (WFStubBuildingMachine,MachineProvisioned, etc) you must then set it up so that when you kick off a VM build it runs whichever stubs you want it to. Typically, the standard is to run WFStubBuildingMachine for things like renaming and setting other custom properties i.e. IP ,storage, etc., then WFStubProvisioned for custom installs after the vm has been built. An example would be adding the machine to DNS (if linux) or joining it to the domain or installing components like IIS. Lastly, the WFStubMachineDisposing is used for the disposal of the machine. So, things like removing it from AD, unlocking the name if you use the System locking method etc.

To do this you will use the following workflow: “Assign a state change workflow to a blueprint and its virtual machines.” The way to do this is the following: when you run it, one of the steps it asks is to assign a workflow to be run during one of the states (building, provisioning, disposing). You will want to create three separate master workflows: one for each state (Building, Provisioning, Disposing). Depending on the master workflow, you will build around it based upon the functionality (see above as to why you would use each one).

Select the first option, which is BuildingMachine. Set your master “BuildingMachine” workflow as the workflow that it calls and select the various blueprints you want to kick the workflow off. From now on, anytime you build a machine from that blueprint, it will now call this master workflow that you selected. Do the same for Provisioning and Disposing. If you ever want to remove these workflows you can just run the “remove a state change workflow from a blueprint and its virtual machines” or manually delete them in your blueprint in vCAC itself:
![]()
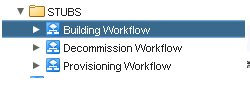
In my example, I have set my master workflow as “Building Workflow”, “Decommission workflow”, and “Provisioning workflow.” To rename the VM to something dynamic, we will be using the Building Machine Workflow.
Here is what my workflow looks like:

To explain this a bit, we have the following needs for a VM name:
Domain makes up the first 3 characters; Location the next three; app code the next three; If it’s a web or database server we add an additional character; we set the classification (Production, QA, Test, etc); Generate a unique ID (01,02,03) then update the properties so vCAC uses the new name.
To keep this example simple, let’s just use two pieces. Let’s say we want a Domain and app code. To set this up, we will want to create a new property in vCAC. Select one of your blueprints, go to the properties tab, and create a new property called “Custom.Domain” with nothing in the value field. Create another called “Custom.AppName” with nothing in the value field.
![]()
The best way to set this up is to use a property dictionary. Here is a good blog post on how to do that. Just mimic this for what we’re doing. http://vcdx56.com/2014/01/14/vcloud-automation-center-network-selection-during-vm-request/
Here are some screencaps of my property dictionary. You can probably just copy what I’ve done since the blog post goes into a bit more detail than we need for this. Be sure and name your property dictionary entries the same as what you called the properties you created in the blueprint (this is what links them together). Of course, you can always put static values in the “value” field of your property if you just want to test.
![]()
Click on edit under “Property attributes”. Select type “valuelist” and enter your values separated by a comma. This is what will be in the dropdown of your blueprint.
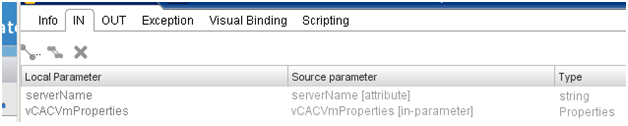
At this point, we can begin to manipulate the actual workflow. Drag and drop a scriptable task onto the form. This will be to grab the Domain name. Here are my inputs, outputs, and script:

![]()
Drag another scriptable task onto the pane after the first. This one is for the App Code.
![]()
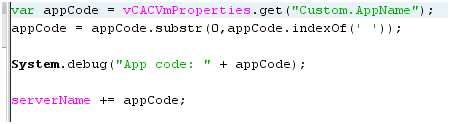
(the second line says to capture from the first character until the first space. My app codes are setup in the following way “Code – Name”. So, you can remove this line assuming you just put in app codes as “SQL”, “ORA” etc.)
At this point our serverName variable is composed of domain + app code. If our domain was “TST” and our appcode “ABC”, the variable would be TSTABC.
Possibly the best part of this for some will be the creation of the unique ID i.e. a unique number at the end of the VM. After all, if you have 1000+ vm’s, it can be a major pain to come up with a unique name automatically. I will include the code here and explain it:
(On a side note, I am not a programmer and I did not write all of this code. I had a basis including the search functionality and had a programmer friend tweak it to make it more efficient)
Copy and paste this into a new scriptable task. The one input is serverName and the one output is finalName (string/attribute).
Here is what it does: It searches both vCenter via the vCenter plugin (pre-requisite for this to work) and the internal vCO locking system to see if the name already exists. If true, increment the number by 1. For example, if TXTABC01 exists, then it will make the name TXTABC02 etc. It also locks the new name in vCO from being used again (be sure to set an unlock workflow to run during your decommission stage or remove the locking line towards the end all together).
Drag and drop a third scriptable task onto the pane, and call it something like “Update Properties.” Here are my ins/outs/script:
![]()


Finally, drag and drop the workflow called “Updated a vCAC model entity.” Here are its properties:

![]()
That’s it: Once the workflow is finalized, your vm will have it’s new name. Be sure you have your customization spec set in your blueprint from vCenter or else sysprep won’t change the name (it will show up in vCenter correctly but the actual OS won’t reflect the change). You’ll set the option that says “Use the virtual machine name.”

I tried this and my machine name is still the auto name. What am I doing wrong?
Hi. Well, it’s tough for me to say. In my experience, the name won’t change if you are not using a vCenter customization spec. Are you? If not go ahead and use one and select the option “Use the virtual machine name”.
Hi Chris – Thank you very much for a fantastic post. This is really help me to avoid vCAC designer. workflow in your post having other scriptable task e.g Get Location, Get App Code, Get Web or DB etc.. Can you please also provide the details of that as well? In last “Updated a vCAC model entity”. can you please help for binding? I am really new to this world…
Thanks in Advance
Hi, I’ll do my best as I might not be fully understanding of what exactly you’re needing help with. For the “get location” type stuff, I used a scriptable task. The code of the scriptable tasks is as follows:
var siteName = vCACVmProperties.get(“Custom.Location”);
System.debug(“Found site: ” + siteName)
serverName += siteName;
Custom.Location is a custom property of my blueprint. If you have a drop down with several options you could do something like this:
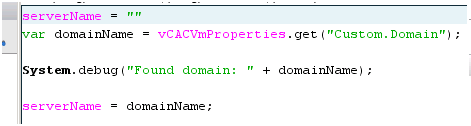
serverName = “”
var domainName = vCACVmProperties.get(“Custom.Domain”);
System.debug(“Found domain: ” + domainName);
// Find the “base” classification code.
switch(true){
case (domainName.search(“A”) > -1):
domainName = “A”;
break;
case (domainName.search(“B”) > -1):
domainName = “B”;
break;
case (domainName.search(“C”) > -1):
domainName = “C”;
break;
default:
errorCode = “Unable to find domain Name: ‘” + domainName + “‘”;
System.debug(errorCode);
throw errorCode;
}
serverName += domainName
In this case, Custom.Domain is a drop down withe 3 options: A, B, and C.
For the update a vcac model entity, here is what mine looks like:
IN:
entity: vcacVM [in-parameter] type: vCAC:Entity
inputProperties virtualMachineProps [attribute] type: Properties
links links[attribute] type: Properties
headers headers[attribute] type: Properties
Out:
updatedEntity propertyEntitye[attribute] type:vCAC:Entitye
Great post, thanks!
This is excellent info, thanks for posting 🙂